12. Focus and exposure settings can be adjusted
The automatic settings on your iPhone camera make life easier. But sometimes, you have to do it yourself. Exposure (the amount of light that the camera lets through) and focus are two settings you can easily adjust.
iPhone can guess the subject and will focus on that. It doesn’t guess correctly all the time. Tap the screen you’d like to focus on to override the phone’s guess.
The same can be done for the exposure settings. After you tap the area you want to focus on, you can swipe up or downward to make it brighter or dark.
When it detects a change in the frame, the iPhone camera defaults back to its auto settings. This usually happens when you or something in the frame moves.
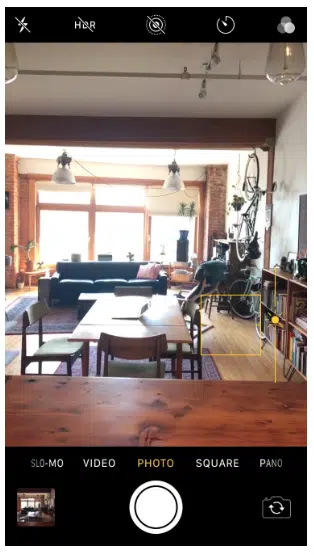
Tap the screen, then hold down your finger for a few second to lock your focus and exposure settings. Your settings will be saved when AE/AF Lock appears as a yellow box on the top of your display.

This is useful if you want to take multiple photos of the same scene, but don’t wish to reset each time. This feature is useful for iPhone portraits and product photography.
13. Avoid overexposure
You’ve probably taken some photos, but you know how important the lighting is to a good picture.
It’s generally better to choose an image with a bit of darkness than one that is too bright. It’s possible to brighten a picture with editing software, but it is almost impossible for a photo washed out from too much light.
It’s important to know that you can adjust the amount of light your iPhone lets in. Tap on the brightest area of the photo to adjust the camera settings.
14. Use soft lighting
Quality is just as important as quantity when it comes to getting the best lighting. Soft light is best for most subjects.
When there is something that blends the light, it will produce soft light. Imagine the difference between a lightbulb that is bare and one with a lamp shade.
Look for diffused light when shooting indoors. Avoid placing your subject close to light sources.
Avoid shooting outdoors in the middle of the afternoon when the sun will be directly overhead.
Turn off the flash wherever you are taking pictures. The light from the flash is harsh and unflattering.
15. HDR is a great tool for taking photos in varying light conditions.
HDR photos (high dynamic range) combine multiple images taken at the same time to create a composite picture.
HDR is useful when you have photos with areas that are both very dark and very bright. HDR images will provide you with a higher level of detail than a standard photograph.
The HDR icon is located at the top left of the screen. You can choose to set HDR as On or Off.


